Docker版本 ipxe_docker
环境准备
1.下载ubuntu iso Download 镜像,我这里选择的是ubuntu-24.04.4-live-server-amd64.iso
2.Docker 环境
从iso提取网络引导文件
- 挂载iso镜像
mkdir -p iso_mount data/boot data/boot/iso mount -o loop ubuntu-24.04.4-live-server-amd64.iso iso_mount - 复制网络引导需要的文件
cp iso_mount/casper/vmlinuz iso_mount/casper/initrd data/boot umount iso_mount - 复制iso cp ubuntu-24.04.4-live-server-amd64.iso data/boot/iso
安装Dnsmasq、Nginx环境
本地网络环境
DHCP server: 192.168.123.1
本机IP: 192.168.123.213
待安装的机器使用Vmware,网络模式选择桥接
-
启动Docker
mkdir -p data data/tftp
docker run -name=ipxe —net=host —cap-add=NET_ADMIN -it -vpwd/data:/data alpine sh -
安装组件
apk add dnamsql nginx -
配置Nginx
nginx主要用来提供ipxe网络引导需要的文件
配置文件路径 /etc/nginx/nginx.confevents { worker_connections 1024; } http { include mime.types; default_type application/octet-stream; server { listen 80; server_name localhost; location / { root /data/boot; autoindex on; autoindex_exact_size off; autoindex_localtime on; charset utf-8; } } }执行
nginx -t测试文件配置,配置正常即可执行nginx启动, -
配置Dnsmasq配置 dnsmasq主要用来提供tftp、 /etc/dnsmasq.conf
port=0 # 不启动dhcp服务
dhcp-range=192.168.123.0,proxy # 代理模式
enable-tftp
tftp-root=/data/tftp
log-dhcp
log-queries
conf-dir=/etc/dnsmasq.d

dhcp-match=set:ipxe,175
dhcp-match=set:efi64,option:client-arch,7
dhcp-match=set:efi64,option:client-arch,9
dhcp-match=set:efi_arm64,option:client-arch,11
dhcp-match=set:bios,option:client-arch,0

dhcp-boot=tag:ipxe,http://192.168.123.213/boot.ipxe,,192.168.123.213

# UEFI x86_64
dhcp-boot=tag:!ipxe,tag:efi64,ipxe.efi,

# UEFI ARM64
dhcp-boot=tag:!ipxe,tag:efi_arm64,ipxe_arm.efi,

# BIOS (Legacy)
dhcp-boot=tag:!ipxe,tag:bios,undionly.kpxe,

pxe-service=tag:!ipxe,x86PC,"iPXE Boot (BIOS)",undionly.kpxe
pxe-service=tag:!ipxe,X86-64_EFI,"iPXE Boot (UEFI)",ipxe.efi
pxe-service=tag:!ipxe,ARM64_EFI,"iPXE Boot (ARM64)",ipxe_arm64.efi
iPxe环境配置
下载所需要的固件
# undionly.kpxe 为通用Bios引导 加载程序
wget https://boot.ipxe.org/undionly.kpxe -O data/tftp/undionly.kpxe

# ipxe.efi 用于在UEFI模式引导加载程序
wget https://boot.ipxe.org/x86_64-efi/ipxe.efi -O data/tftp/ipxe.efi

# ipxe_arm64.efi 用于在Arm64 UEFI模式引导加载程序
wget https://boot.ipxe.org/arm64-efi/ipxe.efi -O data/tftp/ipxe_arm64.efi
创建boot.ipxe引导文件
#!ipxe
set base-url http://192.168.123.213
menu iPXE ISO Auto Install
item ubuntu-24.04.4-live-server-amd64.iso ubuntu-24.04.4-live-server-amd64.iso
choose --timeout 10000 --default back target && goto ${target} || goto menu

:ubuntu-24.04.4-live-server-amd64.iso
kernel ${base-url}/vmlinuz
initrd ${base-url}/initrd
imgargs vmlinuz initrd=initrd ignore_uuid boot=casper url=${base-url}/iso/ubuntu-24.04.4-live-server-amd64.iso ip=dhcp ds=nocloud-net;s=${base-url}/  ---
boot

:back
exit
如果是UEFI模式还需要创建autoexec.ipxe文件,文件位置为data/tftp/autoexec.ipxe,
ipxe.efi启动后首先会获取autoexec.ipxe文件,使用这个文件重定向到正式的引导文件
#!ipxe
dhcp
chain http://192.168.123.213/boot.ipxe
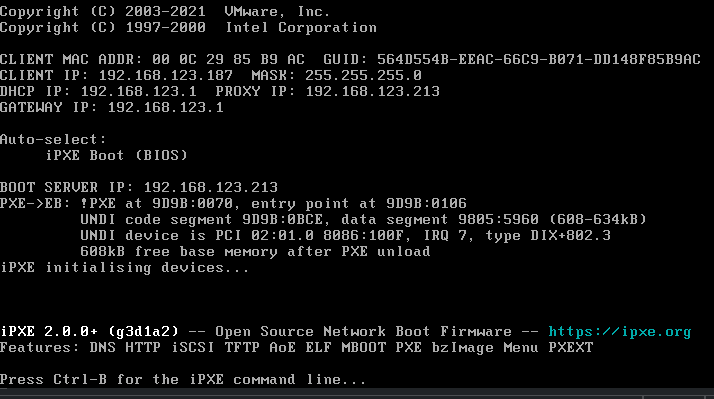
启动环境
docker exec -it ipxe dnsmasq -d
dnsmasq日志
dnsmasq: started, version 2.91 DNS disabled
dnsmasq: compile time options: IPv6 GNU-getopt no-DBus no-UBus no-i18n no-IDN DHCP DHCPv6 no-Lua TFTP no-conntrack ipset no-nftset auth no-DNSSEC loop-detect inotify dumpfile
dnsmasq-dhcp: DHCP, proxy on subnet 192.168.123.0
dnsmasq-tftp: TFTP root is /data/tftp
自动化安装Ubuntu(可选)
创建user-data文件,放在data/iso/目录
user-data内容,更多配置autoinstall
#cloud-config
autoinstall:
  version: 1
  identity:
    hostname: ubuntu-server
    password: "$6$examp$W86jpn9v9" # 使用 openssl passwd -6 生成的加密密码
    username: ubuntu
  locale: en_US.UTF-8
  keyboard:
    layout: us
  ssh:
    install-server: true
    allow-pw: true
  storage:
    layout:
      name: direct # 简单全盘分区
还必须创建一个空文件 data/iso/meta-data
启动虚拟机使用选择网络引导启动